Godot里的像素化后处理
2024-03-05
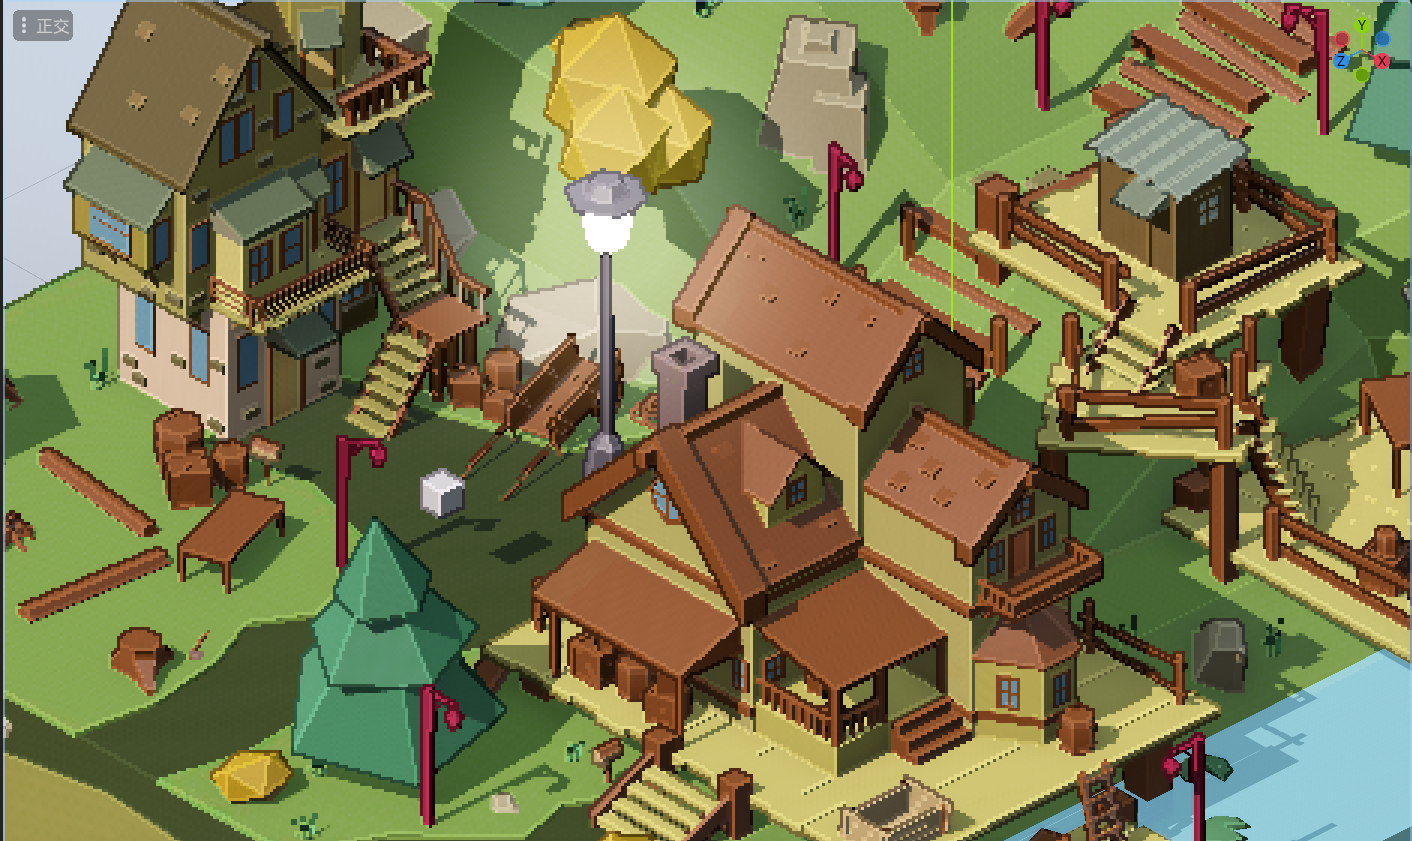
通过一个星期的折腾,我总算通过Godot的shader, 实现了下面这个看起来还不错的效果:

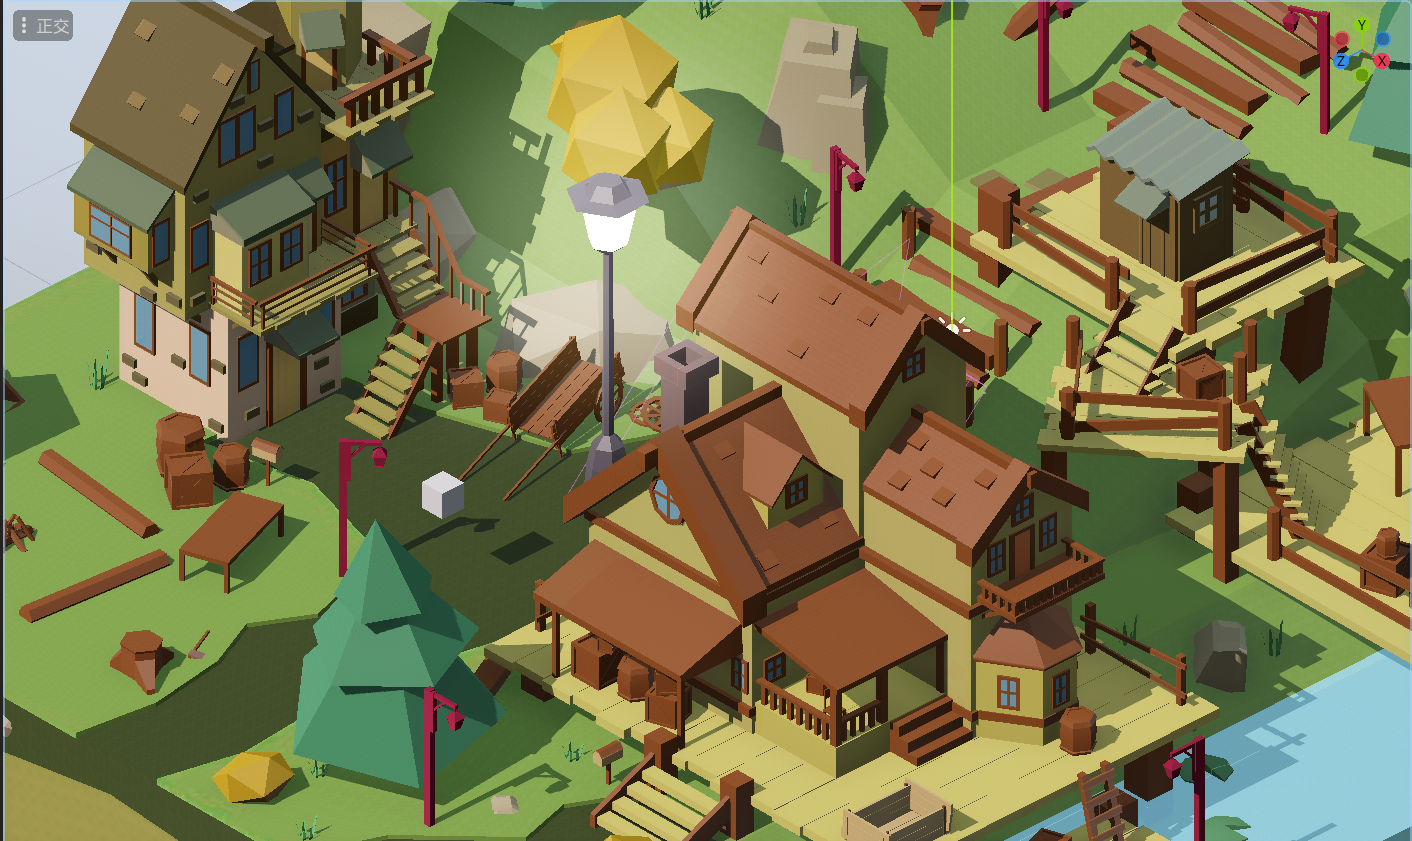
渲染前的原图

我编写了这样的一个后处理shader, 将它附加在全屏Quad里,即可看到效果。我定义了用于设置像素大小的uniform. 值得注意的是,还没有实现Pixel perfect, 这会导致相机移动的过程中会产生奇怪的锯齿抽搐,看久了让人头晕的那种。
以下是代码(第一版)
// 这是像素相机的shader, 贴在相机下的Quad里即可使用。
// 目前还没实现Pixel Perfect, 相机在移动时会产生奇怪的锯齿
shader_type spatial;
render_mode unshaded;

uniform sampler2D SCREEN_TEXTURE: source_color, hint_screen_texture, filter_nearest;
uniform sampler2D DEPTH_TEXTURE : source_color, hint_depth_texture, filter_nearest;
uniform sampler2D NORMAL_TEXTURE: source_color, hint_normal_roughness_texture,filter_nearest;

uniform vec2 render_offset = vec2(0.0, 0.0);

uniform vec2 PIXEL_SIZE = vec2(4,4);
uniform float border_threshold:hint_range(0.0, 0.05, 0.0001) = 0.01;
uniform float inner_edge_threshold:hint_range(0.0, 1.0, 0.1) = 0.4;
varying vec2 screen_uv;
varying vec2 screen_size;

#define PER_PIXEL_UV (PIXEL_SIZE/screen_size) // 每个像素占据的UV

// Robert 算子
const mat3 Robert_Gx = mat3(vec3(0, 0, 0),vec3(0, 0, -1),vec3(0, 1, 0));
const mat3 Robert_Gy = mat3(vec3(0, 0, 0),vec3(0, -1, 0),vec3(0, 0, 1));

// 裁剪矩阵,将mat4裁剪为mat3.保留左上角的矩阵。
mat3 mat4_to_mat3(mat4 raw_mat){
	return mat3(raw_mat[0].xyz, raw_mat[1].xyz, raw_mat[2].xyz);
}

vec2 get_pixelized_uv(){
	return (floor((screen_uv * screen_size + render_offset) / PIXEL_SIZE)+vec2(0.5)) * PIXEL_SIZE / screen_size;
}

vec2 get_nearby_pixelized_uv(ivec2 offset){
	return (floor((screen_uv * screen_size + render_offset) / PIXEL_SIZE)+vec2(0.5)+vec2(offset)) * PIXEL_SIZE / screen_size;
}

float get_depth(){ // 获取线性深度
	float depth = texture(DEPTH_TEXTURE, get_pixelized_uv()).x;
	return depth;
}

// 获取周围点的深度
float sample_nearby_depth(ivec2 offset) {
	float depth = texture(DEPTH_TEXTURE, get_pixelized_uv() + vec2(offset)*PIXEL_SIZE/screen_size).x;
	return depth;
}

// 获取当前点周围8个点内,离相机最近的点的坐标
vec2 get_nearest_pixel_uv(){
	ivec2 local_closest_uv = ivec2(0,0);
	for(int i=-1; i<=1; i++)
		for(int j=-1; j<=1; j++)
			if (sample_nearby_depth(ivec2(i, j)) < sample_nearby_depth(local_closest_uv))
				local_closest_uv = ivec2(i,j);
	return get_nearby_pixelized_uv(local_closest_uv);
}

// Handamard, 对应元素的乘积
mat3 handamard(mat3 mat_a, mat3 mat_b){
	mat3 mat_r;
	for (int i=0; i<=2; i++)
		for(int j=0; j<=2; j++)
			mat_r[i][j] = mat_a[i][j] * mat_b[i][j];
	return mat_r;
}

// Frobenius inner product. 获取对应元素积的和
float frobenius(mat3 matA, mat3 matB){
	mat3 matR = handamard(matA, matB);
	float r = 0.0;
	for (int i=0; i<=2; i++)
		for(int j=0; j<=2; j++)
			r += matR[i][j];
	return r;
}


// 是外边界
bool is_outer_edge(float threshold){
	mat3 nearby_pixels = mat3(0.0); // 当前像素以及周围8个像素
	for(int i=-1; i<=1; i++) //-1,0,1
		for(int j=-1; j<=1; j++){
			// 获取该像素的临近像素. mat[1][1]代表中央点。
			nearby_pixels[i+1][j+1] = texture(DEPTH_TEXTURE, get_pixelized_uv() + vec2(
					PER_PIXEL_UV.x*(float(i)),
					PER_PIXEL_UV.y*(float(j))
			)).x;
		}

	// 计算梯度判断边缘。如果是边缘,那么对这个边缘四周进行采样,找到离相机最近的点的UV,返回那个边缘的材质
	float gradient = sqrt(pow(frobenius(Robert_Gx, nearby_pixels),2) + pow(frobenius(Robert_Gy, nearby_pixels),2));
	if ((gradient > threshold))
		return true;
	else
		return false;
}


bool is_inner_edge(float threshold){
	mat3 nearby_normal_r = mat3(0.0);
	mat3 nearby_normal_g = mat3(0.0);
	mat3 nearby_normal_b = mat3(0.0);
	for(int i=-1; i<=1; i++)
		for(int j=-1; j<=1; j++){
			vec3 nearby_normal = texture(NORMAL_TEXTURE, get_pixelized_uv() + vec2(
					PER_PIXEL_UV.x*(float(i)),
					PER_PIXEL_UV.y*(float(j))
			)).rgb;
			// 分别对R、G、B三个通道进行处理
			nearby_normal_r[i+1][j+1] = nearby_normal.r;
			nearby_normal_g[i+1][j+1] = nearby_normal.g;
			nearby_normal_b[i+1][j+1] = nearby_normal.b;
		}

	// 计算梯度
	float gradient_r = sqrt(pow(frobenius(Robert_Gx, nearby_normal_r),2) + pow(frobenius(Robert_Gy, nearby_normal_r),2));
	float gradient_g = sqrt(pow(frobenius(Robert_Gx, nearby_normal_g),2) + pow(frobenius(Robert_Gy, nearby_normal_g),2));
	float gradient_b = sqrt(pow(frobenius(Robert_Gx, nearby_normal_b),2) + pow(frobenius(Robert_Gy, nearby_normal_b),2));

	// 判断是否为边缘
	if ((gradient_r > threshold) || (gradient_g > threshold) || (gradient_b > threshold))
		return true;
	else
		return false;
}

void vertex() {
	POSITION = vec4(VERTEX, 1.0);}

void fragment() {
	screen_uv = SCREEN_UV;
	screen_size = VIEWPORT_SIZE; // Varying

	if (is_outer_edge(border_threshold))
		ALBEDO = texture(SCREEN_TEXTURE, get_nearest_pixel_uv()).rgb*0.3;
	else if (is_inner_edge(inner_edge_threshold))
		ALBEDO = clamp(texture(SCREEN_TEXTURE, get_pixelized_uv()).rgb*1.4,vec3(0),vec3(1));
	else  // 非边缘
		ALBEDO = texture(SCREEN_TEXTURE, get_pixelized_uv()).rgb;
}
我还没打算解释具体做了什么。也许后面我会考虑自己做个教程视频?
这篇博客只是我自己写着玩的,还没打算正式作为教程发布。如果我的网站不幸被搜索引擎收录,同时你又不幸(不是)看到了它,对这个效果感兴趣的话,不妨去看看原视频吧(如果可以的话,留个评论吧,让我知道这个网站居然会有我以外的人涉足)
https://www.youtube.com/watch?v=WBoApONC7bM
我的实现的代码相当丑陋,也许后期会进行优化,可有的学了。